Can You Use Birch Plywood for Mounting Your Art

Quality Panels
The inevitable questions near plywood include "How do I pick a quality panel for my paintings?" (bold you're looking for quality) and "How do I set the panels for painting?"
A panel good enough for an creative person to use should have one side (call it A) whose surface is polish and gratis of knots, voids, plugs, and seams. The reverse side (B) can be slightly less perfect – perchance with some sanded plugs – but if A is proficient, that does not necessarily mean only slightly less good; there can exist some very poor quality B sides out at that place!
Also inspect all four edges – at that place shouldn't be any voids, and the cut edges should be clean and vertical to the face planes. If you lot're planning on using a 6 mm (i/iv″) panel, it will probably have softwood veneers – pine or luan. If you want to utilize a thicker panel of, say, xviii mm (3/4″), birch is probably the well-nigh accessible hardwood veneer you'll find. Moreover, birch plywood can have a very tight, smooth surface without a prominent grain that'due south easy to size and prime. The quality of birch plywood can vary from species to species, even so, then give your panel a thorough inspection.
Bracing Panels
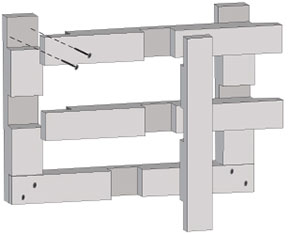
If y'all're going to utilise a console thinner than 18 mm, downwards to vi mm, it will have to be braced in order to continue the console in plane. Panels 30 x 30 cm down to about 15 x xv cm need only perimeter bracing; panels 15 x 15 cm usually do non need bracing as long as you can equalize the confront surface tensions by blanket both sides of the panel with equal numbers of coatings. Panels larger than 30 ten 30 cm will demand perimeter bracing and cross-bracing. Cross-bracing should be practical every 30 cm in both directions (horizontal and vertical).
These "auxiliary supports," as I call the bracing, ought to be congenital as units separate from the panel, then applied to the console. The usual size for a stick is 5 x 10 cm (nominal one″ x ii″), although for large panels (up to 2.4 x one.ii m [8′ x 4′]), I've used 5 10 xx cm (1″ x 4″) sticks. Near artists use store bought 5 x 10 cm pine sticks, but colleagues who brand these panels as a profession have plant them to have a strong potential for warping; they prefer to cut their ain eighteen mm ten 10 cm sticks from 18 mm thick plywood, which, because of the glue used in their manufacture and the nature of their construction, are less probable to warp.
The easiest joints for the average artist/woodworker to make, where one stick meets some other, are lap joints. Where cross-braces cross each other, utilize double lap joints. The tools you need to make braces include a carpenter's square, a back saw and a chisel. Cut the sticks, make the joints, and get together the auxiliary support with yellow aliphatic wood glue used past carpenters; permit it to dry overnight. I've too used construction adhesive (in a caulking tube) for the job, as it dries more than quickly. Once the frame is dry, information technology can be glued as a single unit to the back of your panel. For this, I recommend the yellowish wood glue instead of the construction adhesive; information technology's more durable. Lay the panel on the floor and apply heavy weights to its surface to ensure a good bail between the panel and bracing. Permit to cure overnight. If y'all accept a good number of simple squeeze clamps you can clench the panel and bracing together, and stand the contraption on edge to get information technology out of the way.
Surface Additions
A rigid substrate is definitely recommended for painting in oil, but a lot of artists don't like the smooth and hard surface of a panel – whether plywood or some other product. You can use a linen, cotton fiber, paper, or museum lath surface to the face of the panel to soften the surface a scrap and give it some texture. I utilise an acrylic dispersion gel medium for this because information technology gives me a lot of open up time to reposition the fabric.
You can cut the fabric to about the verbal size of the console (go out a trivial for trimming) or make it near 10 cm larger in both dimensions, and then equally to have plenty extra cloth to wrap around the edge onto the back of the panel or bracing. This makes a nice edge for decorating, should you choose to exercise something similar that. Newspaper can be wrapped likewise, just it's harder to practice considering automobile-made newspaper has a grain that resists against bending.
So, coat the surface of the console with the gel medium about ane mm thick using a brush, a roller, or a spatula. Put the fabric on it and position it so it's hanging evenly over all the edges. Smooth any wrinkles with your hands, working from the centre outward towards the edges. One time you're satisfied with the position of the material, use a rubber brayer to roll the fabric down, again working from the center towards the edges. This will become rid of any bubbling and also make a skilful bond between the textile and the panel surface. Some of the medium will clasp out at the edges. It'due south useful to coat both surfaces before attaching the textile and while you lot're at it, y'all tin can coat the cut edges of the plywood for their protection every bit well.
If you're trimming the material flush with the edges of the console, do information technology now, before the gel medium dries. Employ a single-edge razor or a utility knife.
If you're folding the fabric over the border, plow the object over and put it face-down on a clean surface. Paint the gel medium on the edges and a bit of the reverse of the panel, then pull the textile up and over the edges and attach at the back. I similar to make a neat corner with no bulges by cut out a groovy square of the cloth at each corner so that the seams run across along the corner – that makes framing much easier. Stand the console on border and let it dry out overnight.
To prep the fabric for oil painting with an oil ground, size the fabric with an acrylic dispersion medium designed for the purpose, and then employ an oil ground – traditional lead white in oil, oil/alkyd with titanium white, stack process atomic number 82 white oil ground. Exist sure to follow the manufacturer'due south instructions and health warnings if you're using a ground with atomic number 82 carbonate in information technology. Ii thinned coats of primer/ground are improve than one. Use odorless mineral spirits every bit the thinner and exist certain yous have superior ventilation or habiliment a respirator. Allow to dry until dry-to-touch on, usually three – seven days in a warm environment.
To prep the textile for painting in acrylic dispersion paints, size it with an acrylic dispersion medium designed to prevent Back up Induced Discoloration (SID). Gold GAC 100 is a good i. And then apply two to four coatings of a loftier quality acrylic dispersion primer/ground.
If you desire to paint on the uncovered plywood surface, it nevertheless needs to be sized. The forest surface is unevenly absorbent and a size will even that out. Then you can utilize an oil basis – traditional pb white in oil, oil/alkyd with titanium white, stack process lead white oil basis. Follow the precautions as above, and use a minimum of ii coatings.
If you lot want to employ an acrylic dispersion primer/basis, size it with something similar GOLDEN GAC 100 to prevent SID, then ii to iv coatings of a high quality acrylic dispersion primer/basis.
Suppose you lot want to paint in egg tempera? Brand a modern glue/chalk gesso and utilize five to ten coats of it to the sized panel. As you are doing so, ponder the meaning of gesso: an Italian word meaning "plaster" or "gypsum."
The concluding item to consider is how to brainwash your clients most keeping your paintings. A label is a adept teacher, containing every bit of information most the painting from the construction of the support, to the contents of the size, the ground, the paint, and any last surface blanket, using brand names where possible. In improver, you'll want to tell the client that the optimum environs for storage/display excludes ultraviolet light, and keeps the temperature upwardly to 24°C (75°F) +/- 5°, with the Relative Humidity at about 45% +/- 15%. Nearly homes can reach the temperature requirements, but information technology's very expensive to encounter the museum standard for RH, so don't brand too big a deal out of that. Above all, you want your clients to be able to enjoy your artwork for equally long as they wish, right?
 References
Michael Reid O'Halloran, 1975, Plywood in Hostile Environments: Physical Properties and Applications, American Plywood Association.
Handbook of Finnish Plywood, Finnish Wood Industries Federation, 2002, ISBN 952-9506-63-5 [1]
Engineered Forest Products Association of Australasia.
Pro Woodworking Tips.com.
For the metric conversions, Dashboard on an iMac computer.
Joyce, Ernes. 1970. The Technique of Furniture Making. London: B. T. Batsford Limited.
Wikipedia, the free online encyclopedia
www.woodweb.com
Look up "plywood" in Wiktionary, the costless dictionary.
Canadian Plywood Clan – CANPLY
The Conservation and Fine art Materials Encyclopedia Online (world wide web.cameo.mfa.org, a complimentary resources from the Boston Museum of Fine Arts
The Fine art Materials Information and Educational activity Clan (www.amien.org), an unbiased source of information about art materials. AMIEN is a resource for artists dedicated to providing the well-nigh comprehensive, up-to-date, accurate, and factual information about artists' materials. AMIEN is a 501(c)3 non-profit, charitable arrangement.
Source: https://justpaint.org/plywood-as-a-substrate-for-painting/